My daughter has finally outgrown being in a crib. Actually, she still loves her crib, but we are starting to potty train, so she needs to be able to get up! I didn't start with any sort of pattern, just an idea in my head.
Above are the raw materials I used. I probably spent $50 at Lowes for all of the raw materials. The posts are actually old fence posts from my yard. We had about 30 of them, but they had to be prepped to be able to be used for a baby's bed. I sanded them, bleached them, scrubbed them, and repainted them.
I built the main frame of the bed with the intention that I wouldn't need a regular bed rail. The rail portion will stick about 6-7" above the mattress, once inserted. It covers about 1/3 of the bed's length to provide ample room for baby girl to get in and out, while still providing some protection from falls.
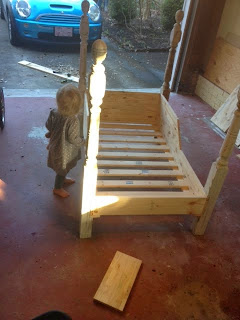
I added the slats to create a platform bed. The mattress we have is about 5" thick, so I used a 1x6, then furring strips to create the slats. This made it so that the mattress is about 1/2" above the edge of the bed, which is perfect so that baby girl can get into and out of the bed with ease and without knocking her legs onto the edge.
To make the posts, I had to notch out spaces in the fence posts. Above you can seen the finished platform bed as well as the bed sitting in the notched posts.
Above are a few different angles after I painted everything. I ended up distressing the paint job with sandpaper after I was finished. I figured that the paint would get all scuffed up being a play space for a toddler, so I thought I would make it purposely distressed.
Here is the finished product in the baby's room! I made the posts so that they could be detached by removing two large screws in each post. That way, when baby girl outgrows the bed, we can more easily store it and/or move it. (This bed is solid wood, so it is incredibly heavy.)
I think this baby loves it!


